

Adding Multiple Service Appointments (Series)
To add multiple service appointments (a series of appointments) for a client, follow these steps:
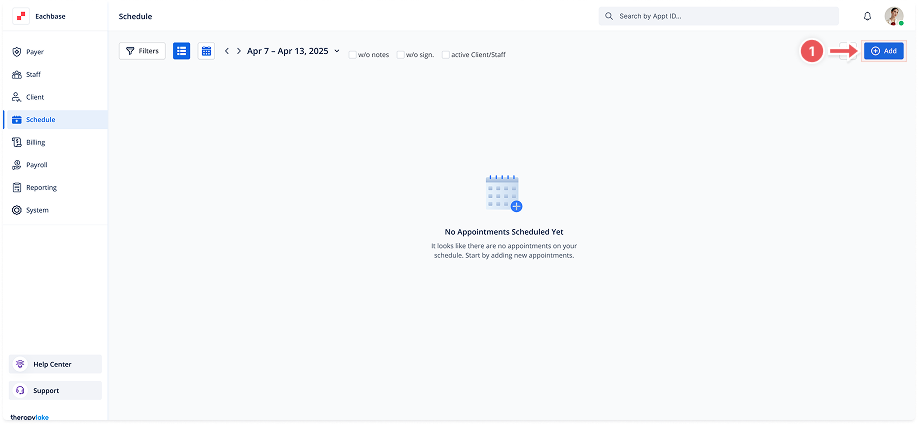
1. Navigate to the Schedule Section
-
Click on the Schedule option from the left-hand side menu.
2. Open the Add Appointment Modal
-
Click on the Add Appointment button in the upper right corner.
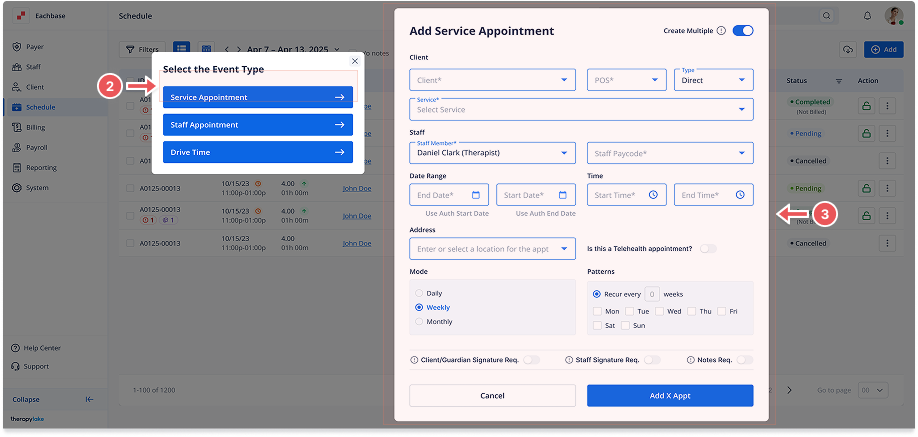
3. Select Event Type
-
A modal labeled "Select the Event Type" will pop up.
-
Choose Service Appointment to proceed.
4. Activate the Create Multiple Toggle
-
In the Add Service Appointment (Series) modal, toggle on the Create Multiple option at the top of the screen. This will switch the modal to the series mode where you can create recurring appointments.
5. Fill in Appointment Details
-
Client: Select the client from the dropdown list.
-
Authorization: Choose the relevant authorization for the client.
-
Service: Select the service you want to schedule.
-
Type: Choose the type of service (e.g., Direct, Indirect).
-
Place of Service: Select where the service will take place.
-
Staff List: Choose the staff member who will conduct the appointment.
-
Staff Paycode: Select the appropriate paycode for the staff.
-
Address: Enter or select a location for the appointment.
-
Credentials: This will be automatically displayed based on the selected staff.
-
Signature/Notes Requirements: Toggle on if the appointment requires a signature or notes.
-
Telehealth Appointment: Toggle if the appointment is a telehealth.
6. Set the Repeat Pattern
-
After filling in the appointment details, click on Repeat Pattern.
-
Date Range: Select the start and end date for the series.
-
Time: Set the start and end time for each appointment.
7. Select Recurrence Mode
-
Daily: Set up appointments to recur every day or every weekday.
-
Weekly: Set up appointments to recur on specific days of the week. Define the interval in weeks.
-
Monthly: Set up appointments to recur on a specific day of every month.
8. Confirm and Review Appointments
-
The modal will display the total number of occurrences (appointments) based on the selected pattern.
-
Click Continue to proceed.
9. Review Overlapping Appointments (if any)
-
If there are any overlapping appointments in the selected pattern, a Confirmation modal will appear.
-
You can either Confirm to skip the overlapping ones or go back and adjust the schedule.
10. Add Appointments
-
Once you are satisfied with the details and the number of appointments to be created, click the Add X Appointments button (where X is the number of non-overlapping appointments).
11. View Scheduled Appointments
-
After successfully creating the series of appointments, you can view them in both the List View and Calendar View under the Schedule section.